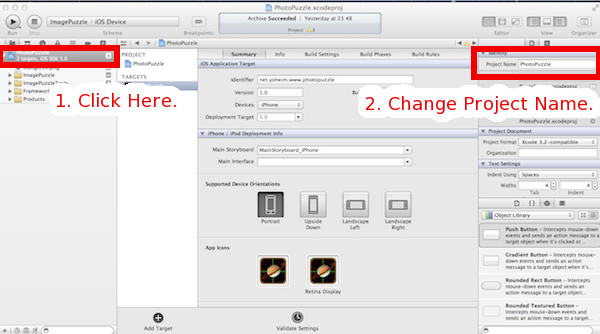
[XCODE] カスタマイズせず使えるUITableViewCellの様々なスタイル
今日は、iPhoneアプリ開発でUITableViewを使う際に、テーブル内に表示する
セルのスタイルをブログに書きたいと思います。
UITableViewCellは、UITableViewCellをカスタマイズする方法@YoheiM.NETに記載した自作方法もありますが、 最初から様々なスタイルも用意されています。
今日は、それらスタイルを使ってみたので紹介したいと思います。
スタイルには、「UITableViewCellStyleDefault」「UITableViewCellStyleSubtitle」 「UITableViewCellStyleValue1」「UITableViewCellStyleValue2」の4つが用意されていて、 それぞれのスタイルを指定して、ラベルとかに値を設定する事で、見え方が変わります。
UITableViewDatasourceプロトコルの「- (UITableViewCell *)tableView:(UITableView *)tableView cellForRowAtIndexPath:(NSIndexPath *)indexPath」で返却するCellのスタイルを指定する事で、 様々なスタイルを利用する事が可能となります。
以下には、それぞれのスタイル毎の使用例を記載したいと思います。


iOS Table View プログラミングガイド(日本語)
最後までお読み頂きましてありがとうございました。
UITableViewCellは、UITableViewCellをカスタマイズする方法@YoheiM.NETに記載した自作方法もありますが、 最初から様々なスタイルも用意されています。
今日は、それらスタイルを使ってみたので紹介したいと思います。
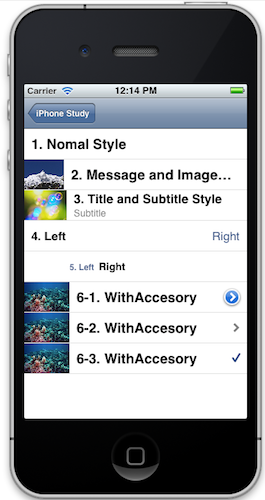
UITabieVlewCellに最初から用意されたスタイルたち
上記の画像は、最初から用意されたスタイルで作成したCellを並べてみた画像です。スタイルには、「UITableViewCellStyleDefault」「UITableViewCellStyleSubtitle」 「UITableViewCellStyleValue1」「UITableViewCellStyleValue2」の4つが用意されていて、 それぞれのスタイルを指定して、ラベルとかに値を設定する事で、見え方が変わります。
UITableViewDatasourceプロトコルの「- (UITableViewCell *)tableView:(UITableView *)tableView cellForRowAtIndexPath:(NSIndexPath *)indexPath」で返却するCellのスタイルを指定する事で、 様々なスタイルを利用する事が可能となります。
以下には、それぞれのスタイル毎の使用例を記載したいと思います。
UITableViewCellStyleDefault - テキストのみ指定した場合
UITableViewCell *cell = [[UITableViewCell alloc] initWithStyle:UITableViewCellStyleDefault reuseIdentifier:@"a"];
cell.textLabel.text = @"1. Nomal Style";
UITableViewCellStyleDefault - テキストと画像を指定した場合
UITableViewCell *cell = [[UITableViewCell alloc] initWithStyle:UITableViewCellStyleDefault reuseIdentifier:@"a"];
cell.textLabel.text = @"2. Message and Image Style";
cell.imageView.image = [UIImageimageNamed:@"1.jpg"];
UITableViewCellStyleSubtitle - テキストとサブタイトルと画像を指定した場合
UITableViewCell *cell = [[UITableViewCell alloc] initWithStyle:UITableViewCellStyleSubtitle reuseIdentifier:@"a"];
cell.textLabel.text = @"3. Title and Subtitle Style";
cell.detailTextLabel.text = @"Subtitle";
cell.imageView.image = [UIImageimageNamed:@"2.jpg"];
UITableViewCellStyleValue1 - テキストとサブタイトルを指定した場合
UITableViewCell *cell = [[UITableViewCell alloc] initWithStyle:UITableViewCellStyleValue1 reuseIdentifier:@"a"];
cell.textLabel.text = @"4. Left";
cell.detailTextLabel.text = @"Right";
UITableViewCellStyleValue2 - テキストとサブタイトルを指定した場合
UITableViewCell *cell = [[UITableViewCell alloc] initWithStyle:UITableViewCellStyleValue2 reuseIdentifier:@"a"];
cell.textLabel.text = @"5. Left";
cell.detailTextLabel.text = @"Right";
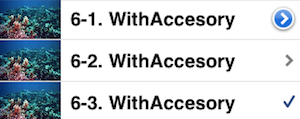
アクセサリーを指定した場合
あと、Styleの指定ではないですが、アクセサリーを指定することで、「>」ボタンなどを表示する事も可能です。UITableViewCell *cell = [[UITableViewCell alloc] initWithStyle:UITableViewCellStyleDefault reuseIdentifier:@"a"]; cell.textLabel.text = @"6-2. WithAccesory"; cell.imageView.image = [UIImageimageNamed:@"3.jpg"]; /* 上図のアクセサリーの指定は以下指定でできます */ // 1番上のアクセサリースタイル cell.accessoryType = UITableViewCellAccessoryDetailDisclosureButton; // 2番上のアクセサリースタイル cell.accessoryType = UITableViewCellAccessoryDisclosureIndicator; // 3番上のアクセサリースタイル cell.accessoryType = UITableViewCellAccessoryCheckmark;アクセサリーには、自作のUIViewを指定する事も可能なようです。
参考資料
以下の資料を参考にしました。iOS Table View プログラミングガイド(日本語)
最後に
こーゆうちょっとした事でも知っていると、無駄にカスタマイズせずにアプリが作れるようになるので 良いですね(*´∇`*) また自分が人に使ってもらうAPIを作る場合にも、こーゆうのを用意すればいいのかぁと、 勉強になってよかった。最後までお読み頂きましてありがとうございました。