[XCODE] UITableViewCellに、様々なコントロール要素をのせて表示する方法
こんにちは、@yoheiMuneです。
今日はUITableCellネタで、ボタン・スライダー・スイッチをUITableViewCell上に配置する方法をブログに書きたいと思います。
どの実装方法も、UITableViewCellのサブクラスを作らずに実現できるので、実装が楽でいい感じです。
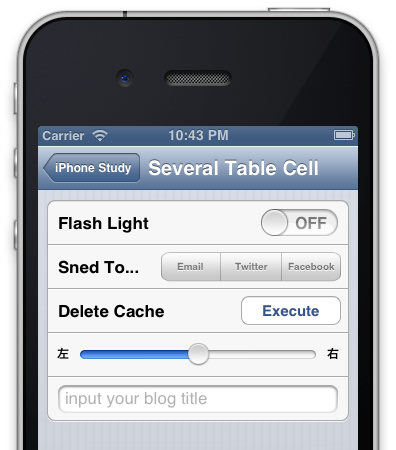
##実際にのせた画像##

UISwitchをUITableViewCellに載せるには、以下のように実装します。
上記のようにaccessoryViewに代入することで、右側にスイッチを置くことができます。
また、UIControlの「addTarget:action:forControlEvents:」を指定することで、ユーザーアクションへ反応することができます。

続いては、セグメントコントロールです。

次に、UIButtonをUITableViewCellに載せる実装です。

続いて、UISliderをUITableViewに載せます。
上記の画像のような配置を行う場合には、今までのaccseeoryViewでは対応できず、contentViewを利用します。
以下が実装コードです。

最後にUITextFieldです。UITableViewCell上に配置する方法はいろいろとありますが、 今回はContentViewを利用した実装例を紹介します。
- カスタマイズせず使えるUITableViewCellの様々なスタイル
- UITableViewCellをカスタマイズする方法
- UITableViewCellで未読件数などをバッヂを表示する方法
- UITableViewでグルーピングして情報を表示する方法
調べたらあまり日本語記事がなかったので、今回ブログを書いてみました。
どなたかの参考になれば良いなぁと思う今日この頃です。
最後までご覧頂きましてありがとうございました。
今日はUITableCellネタで、ボタン・スライダー・スイッチをUITableViewCell上に配置する方法をブログに書きたいと思います。
どの実装方法も、UITableViewCellのサブクラスを作らずに実現できるので、実装が楽でいい感じです。
##実際にのせた画像##
UISwitchをUITableViewCellに載せる
UISwitchをUITableViewCellに載せるには、以下のように実装します。
- (UITableViewCell *)tableView:(UITableView *)tView cellForRowAtIndexPath:(NSIndexPath *)indexPath {

  // tableCellを取得する。
  static NSString *identifier = @"cell";
  UITableViewCell *cell = [tView dequeueReusableCellWithIdentifier:identifier];
  if (cell == nil) {
    cell = [[UITableViewCell alloc] initWithStyle:UITableViewCellStyleDefault reuseIdentifier:identifier];
  }

  // スイッチを作成して、tableCellに載せる。
  UISwitch *sw = [[UISwitch alloc] initWithFrame:CGRectZero];
  // UISwitchはUIContolを継承しているので、タップされた際の動作を簡単に指定できる。
  [sw addTarget:self action:@selector(tapSwich:) forControlEvents:UIControlEventTouchUpInside];
  // accessoryViewに代入するときれいに動作します。
  cell.accessoryView = sw;
  cell.textLabel.text = @"Flash Light";
  return cell;
}

// UISwitchがタップされた際に呼び出されるメソッド。
-(void)tapSwich:(id)sender {
  UISwitch *sw = (UISwitch *)sender;
  NSLog(@"switch tapped. value = %@", (sw.on ? @"ON" : @"OFF"));
}
上記のようにaccessoryViewに代入することで、右側にスイッチを置くことができます。
また、UIControlの「addTarget:action:forControlEvents:」を指定することで、ユーザーアクションへ反応することができます。
セグメントコントロールをUITableViewCellに載せる
続いては、セグメントコントロールです。
- (UITableViewCell *)tableView:(UITableView *)tView cellForRowAtIndexPath:(NSIndexPath *)indexPath {

  // tableCellを取得する。
  static NSString *identifier = @"cell";
  UITableViewCell *cell = [tView dequeueReusableCellWithIdentifier:identifier];
  if (cell == nil) {
    cell = [[UITableViewCell alloc] initWithStyle:UITableViewCellStyleDefault reuseIdentifier:identifier];
  }

  // セグメントコントロールを作成する。
  NSArray *items = [[NSArray alloc] initWithObjects:@"Email", @"Twitter", @"Facebook", nil];
  UISegmentedControl *segment = [[UISegmentedControl alloc] initWithItems:items];
  segment.frame = CGRectMake(0, 0, 180, 30);
  // そのまま載せると少し大きいので、小さめにする。
  NSDictionary *attribute = [NSDictionary dictionaryWithObject:[UIFont boldSystemFontOfSize:10] forKey:UITextAttributeFont];
  [segment setTitleTextAttributes:attribute forState:UIControlStateNormal];
  // セグメントコントロールの値がかわった際に呼び出されるメソッドを指定する。
  [segment addTarget:self action:@selector(segmentChanged:) forControlEvents:UIControlEventValueChanged];

  // accessoryViewに追加する。
  cell.accessoryView = segment;
  cell.textLabel.text = @"Sned To...";
  return cell;
}

// セグメントコントロールの値が変わった際に、呼び出されるメソッド。
-(void)segmentChanged:(id)sender {

  UISegmentedControl *control = (UISegmentedControl *)sender;
  int selectedIndex = control.selectedSegmentIndex;
  NSLog(@"switch tapped. index = %d", selectedIndex);
}
UIButtonをUITableViewCellに載せる
次に、UIButtonをUITableViewCellに載せる実装です。
- (UITableViewCell *)tableView:(UITableView *)tView cellForRowAtIndexPath:(NSIndexPath *)indexPath {

  // tableCellを取得する。
  static NSString *identifier = @"cell";
  UITableViewCell *cell = [tView dequeueReusableCellWithIdentifier:identifier];
  if (cell == nil) {
    cell = [[UITableViewCell alloc] initWithStyle:UITableViewCellStyleDefault reuseIdentifier:identifier];
  }


  // ボタンを作成して、tableViewCellに載せます。
  UIButton *button = [UIButton buttonWithType:UIButtonTypeRoundedRect];
  // rectのx,yは、0で良い。accessoryViewで自動的に上下中央にしてくれる。
  button.frame = CGRectMake(0, 0, 100, 30);
  // ボタンのラベルを指定するには、以下のメソッド。titleプロパティに代入しても反映されない。
  [button setTitle:@"Execute" forState:UIControlStateNormal];
  [button addTarget:self action:@selector(tapButton:) forControlEvents:UIControlEventTouchUpInside];
  cell.accessoryView = button;

  cell.textLabel.text = @"Delete Cache";
}

// ボタンがタップされた際に呼び出されるメソッド
-(void)tapButton:(id)sender {
  NSLog(@"Execute Button tapped.");
}
UISliderをUITableViewCellの上に載せる
続いて、UISliderをUITableViewに載せます。
上記の画像のような配置を行う場合には、今までのaccseeoryViewでは対応できず、contentViewを利用します。
以下が実装コードです。
- (UITableViewCell *)tableView:(UITableView *)tView cellForRowAtIndexPath:(NSIndexPath *)indexPath {

  // tableCellを取得する。
  static NSString *identifier = @"cell";
  UITableViewCell *cell = [tView dequeueReusableCellWithIdentifier:identifier];
  if (cell == nil) {
    cell = [[UITableViewCell alloc] initWithStyle:UITableViewCellStyleDefault reuseIdentifier:identifier];
  }

  // スライダー
  UISlider *slider = [[UISlider alloc] initWithFrame:CGRectMake(30, 10, 240, 20)];
  slider.value = 0;
  slider.minimumValue = -100;
  slider.maximumValue = 100;
  [slider addTarget:self action:@selector(tapSlider:) forControlEvents:UIControlEventTouchUpInside];
  // contentViewにaddViewすることで、Cell上に自由にUIViewを配置できます。
  [cell.contentView addSubview:slider];

  UILabel *leftLabel = [[UILabel alloc] initWithFrame:CGRectMake(5, 10, 20, 20)];
  leftLabel.text = @"左";
  leftLabel.font = [UIFont boldSystemFontOfSize:12.0f];
  leftLabel.textAlignment = NSTextAlignmentCenter;
  leftLabel.backgroundColor = [UIColor clearColor];
  [cell.contentView addSubview:leftLabel];

  UILabel *rightLabel = [[UILabel alloc] initWithFrame:CGRectMake(275, 10, 20, 20)];
  rightLabel.text = @"右";
  rightLabel.font = [UIFont boldSystemFontOfSize:12.0f];
  rightLabel.textAlignment = NSTextAlignmentCenter;
  rightLabel.backgroundColor = [UIColor clearColor];
  [cell.contentView addSubview:rightLabel];

  return cell;
}

// スライダーがタップされたら呼び出されるメソッド
-(void)tapSlider:(id)sender {

  UISlider *slider = (UISlider *)sender;

  UIAlertView *alert = [[UIAlertView alloc]
              initWithTitle:@""
              message:[NSString stringWithFormat:@"%f", slider.value]
              delegate:nil
              cancelButtonTitle:@"OK"
              otherButtonTitles:nil];
  [alert show];
}
UITextFieldをUITableViewCell上に載せる
最後にUITextFieldです。UITableViewCell上に配置する方法はいろいろとありますが、 今回はContentViewを利用した実装例を紹介します。
- (UITableViewCell *)tableView:(UITableView *)tView cellForRowAtIndexPath:(NSIndexPath *)indexPath {

  // tableCellを取得する。
  static NSString *identifier = @"cell";
  UITableViewCell *cell = [tView dequeueReusableCellWithIdentifier:identifier];
  if (cell == nil) {
    cell = [[UITableViewCell alloc] initWithStyle:UITableViewCellStyleDefault reuseIdentifier:identifier];
  }

  // テキストフィールド
  // contentViewにaddする場合には、rectのxとyもちゃんと指定する必要があります。
  UITextField *textField = [[UITextField alloc] initWithFrame:CGRectMake(10, 8, 280, 28)];
  textField.placeholder = @"input your blog title";
  textField.borderStyle = UITextBorderStyleRoundedRect;
  textField.delegate = self;
  [cell.contentView addSubview:textField];
  return cell;
}
関連情報
iPhoneアプリではよく使うTableView。それに関するブログを他にも執筆しておりますので、紹介させていただきます。 ご参考になれば幸いです。- カスタマイズせず使えるUITableViewCellの様々なスタイル
- UITableViewCellをカスタマイズする方法
- UITableViewCellで未読件数などをバッヂを表示する方法
- UITableViewでグルーピングして情報を表示する方法
最後に
今回のブログを書くきっかけとなったのは、iPhoneアプリの設定画面を実装でUISwitchなどをどうやって配置するのだろうと疑問を持ったところからでした。調べたらあまり日本語記事がなかったので、今回ブログを書いてみました。
どなたかの参考になれば良いなぁと思う今日この頃です。
最後までご覧頂きましてありがとうございました。